To accurately identify low voltage output issues, start by checking your power supply and circuit connections for proper wiring and secure contacts. Verify your voltage settings and make small adjustments while testing with a multimeter. Inspect terminals for corrosion or looseness, and examine the transformer and components for damage. Also, evaluate load demands, wiring integrity, and grounding. Following these steps helps pinpoint causes; keep exploring for detailed troubleshooting tips.
Key Takeaways
- Verify proper power supply connections and ensure the voltage regulator is correctly oriented and functioning.
- Use a multimeter to check voltage levels at various circuit points and confirm they meet specifications.
- Inspect terminals, wiring, and connectors for corrosion, looseness, or damage that could cause voltage drops.
- Evaluate transformer and power supply components for damage, overheating, or incorrect output voltages.
- Confirm grounding, shielding, and load capacities are appropriate and free of issues that could impact voltage stability.

Porch Shield Waterproof Universal Generator Cover 32 x 24 x 24 inch - for Most Generators 5000-10000 Watt, Black
Compatible - More sizes for 5000w -10000w gas generator or inverter generator.
As an affiliate, we earn on qualifying purchases.
Verify Power Supply and Circuit Connections

Before troubleshooting the low voltage output, you should verify that the power supply is functioning correctly and that all circuit connections are secure. Start by consulting the circuit diagrams to ensure proper wiring and identify key points where voltage flows. Check the voltage regulators, as they maintain stable voltage levels; if they’re faulty or misconnected, output drops. Use a multimeter to test voltage at various points, confirming the power supply provides the correct voltage. Make sure all connectors and wires are tight and free of corrosion. Loose or damaged connections can cause voltage drops. Double-check the placement of voltage regulators and ensure they’re correctly oriented. Additionally, verifying the power supply’s capacity helps ensure it can support the connected components properly. Clarifying these basic steps helps eliminate simple issues before moving on to more complex troubleshooting.

Cummins A065U664 Generator Remote Control
ONAN EC-AGS+ (GASOLINE & LP)
As an affiliate, we earn on qualifying purchases.
Check the Voltage Settings and Adjustments

Ensuring the voltage settings are correct is a crucial step in troubleshooting low output issues. Begin by checking the device’s voltage regulation settings and compare them with the manufacturer’s specifications. If the voltage regulation isn’t set properly, it can lead to insufficient output. Follow the adjustment procedures outlined in the equipment manual, making small, incremental changes to avoid overshooting the desired voltage. Use a reliable multimeter to verify each adjustment, ensuring accuracy. After making adjustments, re-test the output to confirm the voltage is within the correct range. Properly calibrated voltage settings help maintain stable operation and prevent low voltage problems caused by incorrect regulation. Always document your adjustments for future reference and troubleshooting. Additionally, staying informed about AI security vulnerabilities can help anticipate potential risks that might affect your equipment’s operation.

AMERISUN 4500W Inverter Generator, Gas Powered 223cc 4-Stroke Engine,CO Sensor & Parallel Ready, Quiet RV Generator with Eco Mode, 120V 30A RV Outlet for Home Backup, Camping & Outdoor Power
RELIABLE HIGH-OUTPUT POWER – This 4500W peak / 3600W rated inverter generator is powered by a dependable 223cc...
As an affiliate, we earn on qualifying purchases.
Inspect for Loose or Corroded Terminals

Loose or corroded terminals can cause poor electrical connections, leading to low voltage output. You should inspect the terminal connections thoroughly, making sure they are tight and secure. Loose terminals can disrupt the flow of electricity, while corrosion can increase resistance and reduce voltage. Look for signs of corrosion, such as greenish or whitish deposits around the terminals. If you notice corrosion, clean the terminals carefully using a wire brush or terminal cleaner. Always prioritize corrosion prevention by applying dielectric grease or corrosion inhibitors after cleaning. Tightening loose connections and maintaining clean terminals helps ensure a solid electrical connection, preventing voltage drops. Regular inspection of terminal connections is a simple yet effective step to troubleshoot low voltage issues and keep your system running smoothly. Proper maintenance practices can also extend the lifespan of your electrical components.

maXpeedingrods 4000 Watt Portable Inverter Generator, Bluetooth® App Remote Data Monitor, with Generator Parallel Kit with 120V 30A, 120V 50A Outlets and 50-Amp Circuit Breaker
【High Output】This parallel kit can easily connect two generators to achieve a rated power output of 6000W, suitable...
As an affiliate, we earn on qualifying purchases.
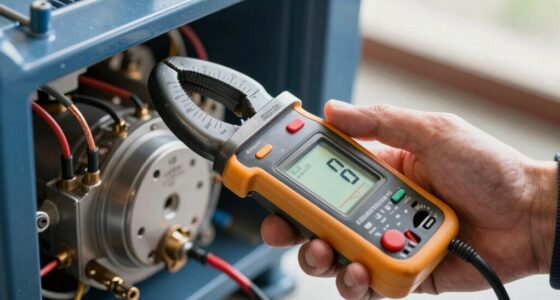
Test the Output With a Multimeter

To test the output with a multimeter, start by setting it correctly for voltage measurement. Then, carefully measure the voltage and verify you’re reading accurately. Finally, record your results and compare them to the expected specifications to identify any issues. Remember, understanding the role of fathers in guiding and supporting can be analogous to interpreting multimeter readings—both require careful attention to detail.
Set Multimeter Properly
Before testing the output, you need to set your multimeter correctly. Proper setup guarantees accurate readings and accounts for potential voltage fluctuation. Start by selecting the correct measurement mode—usually DC voltage for power supplies. Check that your multimeter is properly calibrated to prevent errors. Ensure the range is suitable for the expected voltage; if unsure, start with a higher range. Connect the leads securely, with the black lead on ground and the red on the output. Confirm the multimeter is on the correct setting before testing. Regular multimeter calibration helps maintain measurement accuracy, especially when monitoring fluctuating voltages. Always double-check connections and settings to avoid misinterpretation of low voltage output issues. Vetted Proper setup is key to diagnosing your system correctly.
Measure Voltage Accurately
Ensuring an accurate voltage reading starts with proper measurement techniques. To prevent inaccuracies caused by voltage fluctuation, keep your multimeter steady and ensure good contact with the terminals. Always select the correct setting for voltage measurement, and avoid touching the probes with your hands to reduce interference. Make sure the device is powered on and operating normally during testing. Check for any signs of instability in the voltage, as fluctuations can skew your reading. Take multiple measurements if needed to verify consistency, focusing on measurement precision. Avoid rushing through the process—precision in your readings is key to diagnosing low voltage issues accurately. Proper measurement techniques help you identify real voltage problems versus transient fluctuations, saving time and preventing misdiagnosis. Understanding measurement accuracy is crucial for reliable troubleshooting.
Record and Compare Results
Recording and comparing your results is essential for accurately diagnosing voltage issues. It helps you identify patterns of voltage stability or fluctuations caused by circuit noise. Consistently test your output at different times to spot irregularities. Keep detailed records of each measurement for future reference. Use these key points to guide your process:
- Note the voltage reading with your multimeter and the test conditions
- Check for consistent voltage levels over multiple tests
- Observe any circuit noise or fluctuations during testing
- Compare current readings with previous results and manufacturer specifications
- Look for sudden drops or irregularities indicating potential issues
- Regularly review your Honda tuning modifications, such as ECU remapping or performance upgrades, to ensure your electrical system remains stable and efficient
Examine the Transformer and Power Supply Components

Start by inspecting the transformer for any visible damage or signs of overheating, such as discoloration or burnt smells. Next, test the power supply components with a multimeter to guarantee they’re providing the correct voltage levels. Confirming these elements are functioning properly helps identify potential issues causing low voltage output. Additionally, consider whether the electrical connections are secure and free of corrosion, as poor connections can also lead to voltage problems.
Transformer Inspection Tips
To effectively diagnose low voltage output issues, begin by inspecting the transformer and power supply components for signs of damage or wear. Focus on the transformer core for any signs of overheating, rust, or physical deformation, as these can indicate core issues affecting performance. Check the insulation integrity around wiring and connections to prevent shorts or leaks that lower output voltage. Look for burned or cracked insulation, which compromises safety and function. Ensure all connections are tight and free of corrosion. Test for any unusual noise or vibrations that suggest internal problems. Finally, examine the transformer’s mounting and physical condition for signs of stress or damage. Properly inspecting these elements helps identify root causes that might be affecting voltage output. Additionally, reviewing the security of connections can prevent unexpected voltage drops and ensure reliable operation.
Power Supply Testing
When testing the power supply and transformer, it’s essential to systematically check each component for proper operation. Start by measuring the output voltages with a reliable multimeter to detect voltage fluctuation, ensuring they stay within manufacturer specifications. Check for signs of damage or corrosion on the transformer and power supply components, which can cause unstable power delivery. Examine the connections and wiring, confirming they’re secure and free of shorts. Use a load tester if available to evaluate power stability under load conditions. Unstable or inconsistent voltage readings often indicate faulty components that need replacement. Additionally, verifying the efficiency of the system can help identify underlying issues affecting performance. By thoroughly testing each part, you’ll identify issues causing low voltage output and prevent future fluctuations that compromise device performance.
Evaluate Load Conditions and Excessive Demand

Evaluating load conditions and excessive demand is essential when troubleshooting low voltage output. You need to check if the load exceeds the system’s load capacity, which can cause a demand overload. Overloading circuits diverts power, leading to voltage drops.
Consider these factors:
- The total load connected at peak times
- Any recent additions increasing demand
- Devices drawing more current than specified
- Circuit breakers tripping due to overload
- Sudden spikes in demand during specific periods
Inspect for Faulty or Damaged Wiring

Faulty or damaged wiring is a common cause of low voltage output, so you should carefully examine all wiring connections. Begin by checking wiring continuity to ensure there are no breaks or loose connections that could interrupt power flow. Use a multimeter to test continuity across wires, confirming they’re intact. Additionally, assess insulation resistance; damaged insulation can cause shorts or leaks, further reducing voltage. Look for signs of wear, cracks, or burns on insulation materials. Pay close attention to connection points, terminals, and junction boxes, as corrosion or corrosion-related damage can impair conductivity. If you find any wiring issues, replace or repair the damaged sections immediately. Proper inspection of wiring integrity helps prevent voltage drops caused by faulty wiring and ensures your system runs efficiently.
Confirm Proper Grounding and Shielding

Proper grounding and shielding are essential to maintain stable voltage output; neglecting these can lead to significant power issues. Grounding issues can cause voltage fluctuations, while poor shielding effectiveness allows interference that lowers voltage levels. To ensure proper grounding and shielding, check that all grounds are secure and free of corrosion. Use shielded cables correctly, connecting shields to ground at one or both ends as recommended. Verify that shielding is continuous and intact, preventing electromagnetic interference. Avoid unintended ground loops, which can disrupt voltage stability. Regularly inspect grounding points and shielding connections to prevent degradation. Maintaining proper grounding and shielding minimizes grounding issues and boosts shielding effectiveness, ensuring your system delivers consistent, reliable voltage output without guesswork.
Frequently Asked Questions
Can Environmental Factors Affect Low Voltage Output Performance?
Yes, environmental factors like interference and humidity can influence low voltage output performance. Environmental interference from nearby electronic devices or electromagnetic sources can cause fluctuations or drops in voltage. Additionally, high humidity levels can lead to moisture buildup, causing short circuits or corrosion that impair electrical connections. You should regularly check for these conditions and take measures to minimize their impact to ensure stable voltage output.
How Often Should I Perform Maintenance on Low Voltage Systems?
Think of your low voltage system like a garden that needs regular tending. You should perform a system inspection and follow a maintenance schedule at least once every six months. Regular checks help catch issues early, preventing low voltage output problems down the line. Keep an eye on connections, wiring, and components, and don’t wait until something breaks—staying proactive keeps your system running smoothly and efficiently.
What Are the Signs of Imminent Failure in Power Components?
If you notice voltage fluctuation or inconsistent power levels, it’s a sign of imminent failure in your power components. You might also see signs of component wear, like discoloration, overheating, or unusual noises. These indicators suggest that your system is struggling to maintain stability and could fail soon. Regularly inspecting for these signs and addressing issues promptly helps prevent unexpected outages and extends your system’s lifespan.
Are There Specific Safety Precautions for Testing Voltage Output?
Think of testing voltage output as walking a tightrope—you need balance and focus. Always prioritize voltage safety by wearing insulated gloves and using properly rated tools. Follow strict testing procedures, guaranteeing the power is off before connecting your meter. Keep one hand behind your back to prevent accidental shocks, and double-check your connections. These precautions protect you from electric hazards and ensure accurate readings every time.
How Do Temperature Variations Influence Voltage Stability?
Temperature variations can considerably impact voltage stability by causing thermal fluctuations that alter your circuit’s behavior. As temperatures rise or fall, resistance changes occur in components like resistors and conductors, leading to voltage fluctuations. You should monitor your environment and use temperature-compensated components when possible. By understanding these effects, you can reduce inaccuracies and maintain consistent voltage output, ensuring your system operates reliably despite thermal fluctuations.
Conclusion
By meticulously checking each connection and component, you’re tending to the heart of your system—its lifeblood. Think of your efforts as tending a garden, where each correct step nurtures essentiality and growth. When you address the low voltage output with care, you’re restoring harmony, ensuring the energy flows like a river finding its course. With patience and precision, you bring balance, turning technical troubleshooting into a symphony of reliable performance.