
TL;DR
Moving your rig into a closet or another room is the most effective way to cut noise. Proper placement of panels, sealing gaps, and ventilation are key to balancing sound reduction and heat management in small spaces.
Imagine your AI rig roaring in the corner, while you sit a few feet away, trying to work in peace. It’s frustrating. The truth? The best way to quiet a noisy setup isn’t just more foam — it’s to put real distance and barriers between you and the noise. That’s where the idea of a “rig in the closet” shines. But it’s not just about shoving a machine into a tiny space. Knowing how to treat that space properly makes all the difference.
This guide walks you through the smartest ways to dampen sound, where to place panels, and how to keep your closet rig cool without turning it into a sauna. You’ll learn why moving your setup into another room beats all the fancy foam, and how to make a closet work without cooking your hardware.
Acoustic dampening
& the rig in the closet.
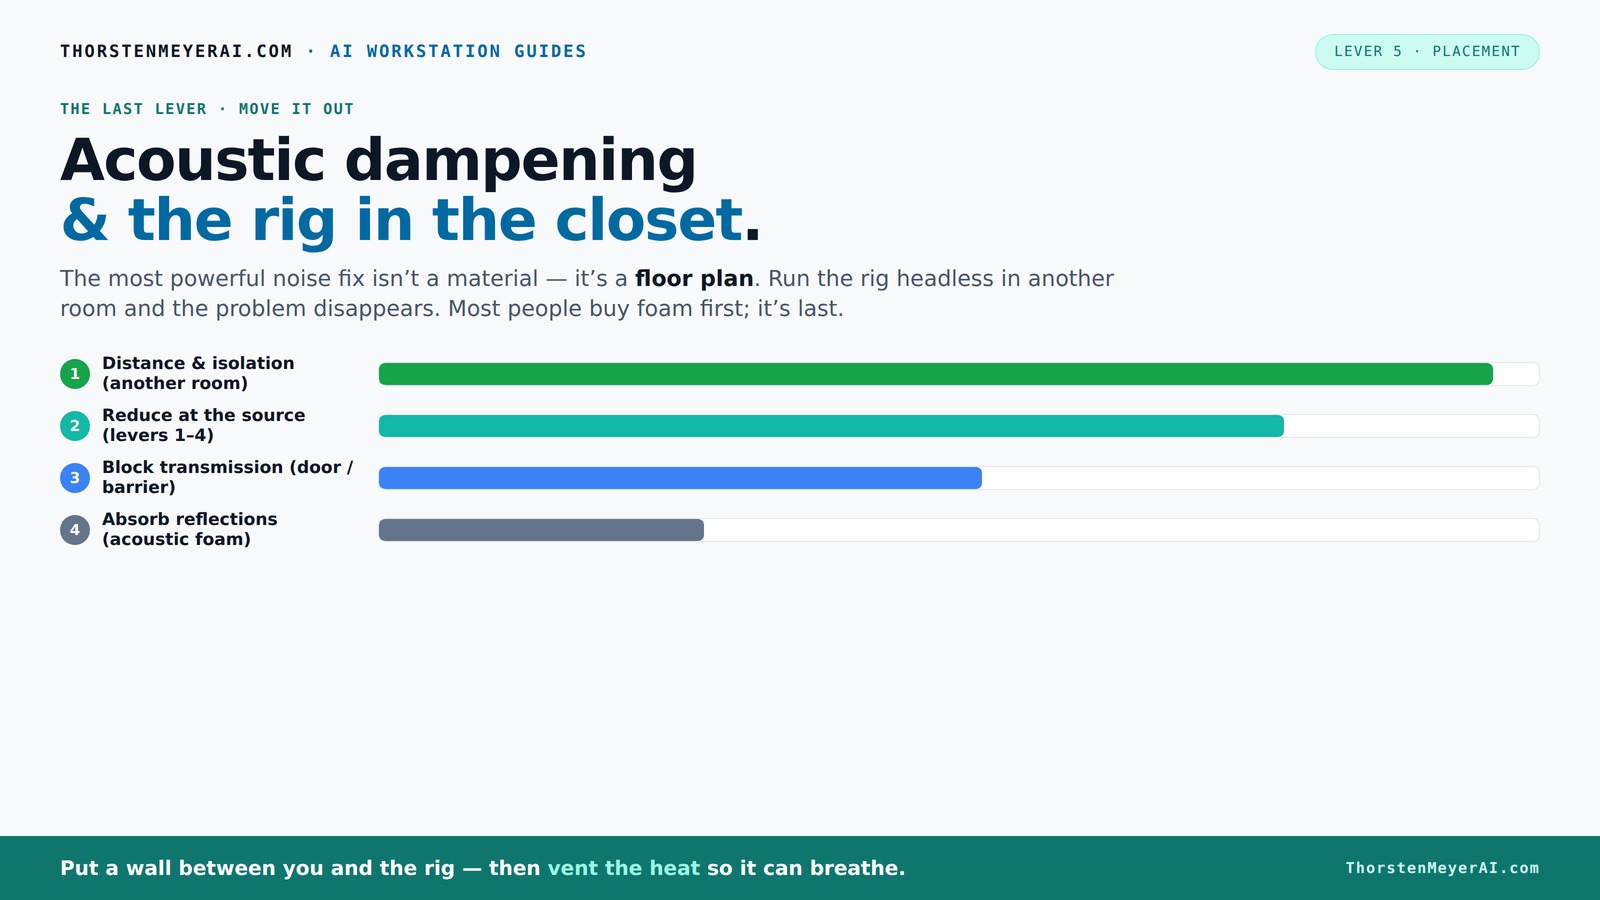
The most powerful noise fix isn’t a material — it’s a floor plan. A rig you can’t hear because it’s in another room beats any amount of foam. Tap the approaches in Part 1 to see what actually works.
(another room)
(levers 1–4)
(door / barrier)
(acoustic foam)
Contain the noise, not the heat
Key Takeaways
- Moving your rig into another room or closet drastically reduces noise without costly treatments.
- Proper ventilation is critical when placing a high-heat machine in a sealed space; passive vents and exhaust fans keep everything cool.
- Strategic placement of acoustic panels at first-reflection points and sealing gaps around doors and vents boosts sound isolation.
- Sealing leaks and adding mass around doors and vents can block over 80% of sound leakage in small spaces.
- Layering insulation, sealing, and ventilation creates a practical balance between quiet and safe operation.

Porch Shield Waterproof Universal Generator Cover 32 x 24 x 24 inch - for Most Generators 5000-10000 Watt, Black
Compatible - More sizes for 5000w -10000w gas generator or inverter generator.
As an affiliate, we earn on qualifying purchases.
Why Moving Your Rig Is the Most Powerful Noise Fix
The number one step to quiet your rig is simple: get it as far away from you as possible. Distance cuts noise dramatically. Think of it like a waterfall — the farther you move from it, the quieter it sounds. For an AI workstation, you don’t need to sit next to the hardware. Instead, you can run it headless, accessed over your network.
For example, a friend set up his GPU in a spare room on a separate floor. His laptop became his interface, and suddenly, the noise no longer intruded on his focus. This approach often costs nothing but a good network connection and some ventilation planning.
According to experts, this is the most effective way to reduce noise — more than foam or acoustic panels ever could. The noise simply doesn’t reach your workspace if the machine is in another room. The implication is significant: by simply relocating your hardware, you eliminate the need for complex damping solutions, saving time and money. However, this tradeoff is that you need reliable network access and possibly longer cable runs, which might introduce latency or require additional setup. Still, the reduction in noise pollution makes this a top priority for quiet workspaces.

Fsehyue 29.5x19.7x23.6 Inch Aluminium Generator Toolbox Heavy Duty Generator Storage Box Fully Sealed with Lock and Keys suitable for RV Garage
Excellent performance - Fsehyue generator toolbox is designed to effectively protect your home generator in bad weather, extending...
As an affiliate, we earn on qualifying purchases.
The 'Rig in the Closet' Setup: Why It Works and What to Watch Out For
Placing your rig inside a closet can be a game-changer. It muffles noise without expensive soundproofing. But there’s a big catch: heat. A sealed closet traps hot air, which can cook your hardware. Imagine a GPU running at 85°C because it can’t vent properly — that’s a recipe for throttling and loud fan noise.
The trick? You must give your closet some airflow. Passive vents, exhaust fans, or even ducted systems help hot air escape while keeping noise contained. Brands like [soundproof cabinets](https://thorstenmeyerai.com/low-noise-pc-cases-airflow/) combine foam lining with active ventilation to keep rigs cool and quiet. The key is balancing soundproofing with cooling—overly sealed spaces trap heat, forcing fans to work harder and generate more noise. Conversely, insufficient sealing allows sound leaks. The tradeoff is that adding ventilation can introduce noise if not properly designed, so selecting quiet fans and proper ducting is essential. The benefit is a dramatic reduction in noise pollution at the cost of some additional complexity and potential maintenance.
For example, a user built a custom closet setup with a quiet exhaust fan and weatherstripping. His noise dropped below 30 dB, but he kept his GPU cool at 70°C even during long training sessions. Without proper ventilation, the heat would have spun fans into a noisy frenzy, defeating the purpose of the enclosure. Therefore, understanding the heat dissipation needs of your hardware is critical when designing a closet setup. It’s a tradeoff: more ventilation means better cooling but potentially more noise if not carefully managed; less ventilation risks overheating and hardware damage.

WPLUS WORKS 30"X23"X23" Aluminum Generator Enclosure Box – Outdoor Waterproof | Shockproof Storage Shed for Portable Generator Equipment ToolBox(Diamond Checkerboard-Sliver)
Underbody Aluminum Diamond Chessboard /5 Bar Thread Tool Box and finish with UV resistant satin black powder coating...
As an affiliate, we earn on qualifying purchases.
Placement Secrets: Where to Put Acoustic Panels and Why
Acoustic dampening isn’t just about slapping foam on walls. It’s about strategic placement. The first-reflection points — where sound bounces directly to your ears — are prime spots. For a closet, focus on walls near your desk, the ceiling, and even the door frame.
For instance, in a tiny closet, placing foam panels at ear level and on the ceiling can cut echo and reflections by up to 60%. Don’t forget the door. Sealing gaps with weatherstripping or acoustic caulk traps sound inside. And soft materials like clothing or blankets can serve as makeshift dampers. The importance of placement lies in disrupting the paths that sound takes to reach your ears. By treating the most reflective surfaces, you reduce echo and improve clarity, which is especially important if you’re recording or need precise audio monitoring. The tradeoff is that improper placement or uneven coverage can lead to uneven sound absorption, leaving some reflections unmitigated. The goal is to create a balanced environment where sound is absorbed across multiple surfaces, reducing overall reverberation and echo, and improving the listening experience.
Fsehyue 31.5x 18x 21.5 Inch Aluminium Generator Toolbox Heavy Duty Generator Storage Box with Ventilation Grille with T-Handle Lock and Keys Suitable for Rvs Bumper
Excellent performance - Fsehyue generator toolbox is designed to effectively protect your home generator in bad weather, extending...
As an affiliate, we earn on qualifying purchases.
How to Seal Gaps and Block Sound Leaks Effectively
Small gaps in doors and vents are the biggest culprits for sound escaping your closet. Sealing them is cheap and effective. Use weatherstripping around the door frame, apply acoustic caulk along cracks, and add a door sweep to block sound from sneaking underneath.
For example, sealing a closet door with weatherstripping and a sweep reduced sound leakage by over 80% in one project. It’s a quick fix that pays off. But more than just sealing, understanding why gaps matter helps you see the bigger picture: even tiny openings can significantly undermine your soundproofing efforts by allowing sound to leak out or external noise to intrude. The tradeoff is that over-sealing or improper application can lead to issues like moisture buildup or difficulty opening doors. Vibration isolation matters too. Placing rubber feet or anti-vibration pads under your rig minimizes structure-borne noise that travels through the floor and walls, further enhancing soundproofing effectiveness. Recognizing the importance of these small details can make a big difference in achieving a quieter environment.
Ventilation and Cooling: Keeping Your Closet Rig Safe
Trapped heat is the enemy of a quiet, reliable rig. You need airflow — without turning your closet into a noisy furnace. Use quiet exhaust fans, ducted cooling, or even an AIO liquid cooler with exhaust radiators to move heat outside.
For example, a DIY enthusiast installed a small duct leading from his closet to a window, with a quiet fan pulling hot air out. His GPU stayed below 70°C, and the noise was barely noticeable. Proper ventilation isn’t just about cooling—it’s about preventing thermal buildup that can cause hardware to throttle or fail prematurely. The tradeoff here involves balancing noise levels from fans with effective cooling. Overly powerful or noisy fans defeat the purpose of quieting your space, so choosing low-noise, high-efficiency solutions is vital. Additionally, the placement of vents and ducts affects how well heat is expelled; improper setup can lead to hotspots or increased noise from fans working harder. Understanding your hardware’s thermal profile and integrating cooling solutions accordingly ensures your system stays safe and quiet.
What a 'Perfect' Closet Setup Looks Like (and What It Doesn’t)
There’s no magic bullet. A closet setup can be very effective but won’t eliminate all noise or heat issues. Expect some residual sound, especially if the space isn’t perfectly sealed or ventilated. The goal is to make it good enough for your needs — cleaner audio, less distraction.
For example, a YouTube creator turned his closet into a quiet recording space with foam, sealing, and a small fan. It’s not soundproof, but it’s way better than a noisy desk setup. Remember: the best approach is layered — combine sealing, damping, and ventilation. Each layer addresses a different aspect: sealing reduces leaks, damping minimizes reflections, and ventilation manages heat. The tradeoff is that no single solution is perfect; instead, combining multiple strategies yields the best results. Be realistic about expectations: even the most carefully designed closet won’t be as silent as a professional sound studio, but it can significantly improve your comfort and audio quality.
In essence, understanding the limitations and focusing on layered improvements allows you to create a practical, effective environment tailored to your specific needs, balancing noise reduction, heat management, and accessibility.
Frequently Asked Questions
Where should I place acoustic panels in my closet?
Attach panels at first-reflection points—where sound hits your ears first—like walls near your desk and the ceiling. For a small closet, focus on walls at ear level and the door frame to reduce echo and reflections.
Do I need to treat the corners?
Corners are essential for bass traps, but in tiny closets, wall and ceiling treatment often matter more. Adding panels at ear level and on the ceiling can significantly improve sound clarity without complex corner bass trapping.
Will acoustic foam soundproof my closet?
No — foam reduces echo and reflections but doesn’t block sound from escaping or entering. For true soundproofing, sealing gaps and adding mass are necessary, especially around doors and vents.
What is the cheapest effective setup?
Start with weatherstripping around the door, sealing gaps, adding blankets or clothes as makeshift dampers, and using a small exhaust fan if needed. These low-cost steps make a noticeable difference before investing in costly modifications.
How much treatment do I need?
More coverage generally equals better results. Distribute foam and panels across multiple surfaces symmetrically—walls, ceiling, door—to achieve a more controlled, less echoey environment.
Conclusion
Quieting a noisy AI rig or recording space isn’t about more foam — it’s about smart placement, sealing gaps, and giving your hardware room to breathe. Moving your setup into a closet or another room can make a world of difference, especially when paired with good ventilation and strategic damping.
Think of your closet as a ‘quiet zone,’ not a soundproof vault. With the right approach, you’ll enjoy cleaner vocals, less distraction, and a hardware setup that stays cool and quiet. Your workspace — and your sanity — will thank you.